USING NMAP TO PERFORM A TCP CONNECT SCAN
USING NMAP TO PERFORM A TCP CONNECT SCAN
USING NMAP TO PERFORM A TCP CONNECT SCAN: The first scan we will look at is called the TCP connect scan. This scan is often considered the most basic and stable of all the port scans because Nmap attempts to complete the three-way handshake on each port specified in the Nmap command.
Because this scan actually completes the three-way handshake and then tears down the connection gracefully, there is little chance that you will flood the target system and cause it to crash.
If you do not specify A Specific port range, Nmap will scan the 1000 most common ports. Unless you are in a great hurry, it is always recommended to scan all ports, not just the 1000 most common.
The reason is that oftentimes crafty administrators will attempt to obscure a serive by running it on a nonstandard port. You can scan all the ports by specifying “-p- “when running Nmap.
Using the “-pn” switch with every Nmap scan is also recommended. Utilizing the “-pn” switch will cause Nmap to disable host discovery useful for discovering additional systems and ports that otherwise may be missed.
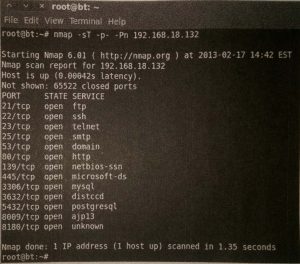
To run a TCP Connect Scan, we issue the following command from a terminal:
Nmap –sT –p- -Pn 192.168.18.132
Take a moment to review this command. The first word “nmap” causes the Nmap port scanner to start.
The second command “-sT” tells Nmap to run a TCP connect scan. Specifically, to break this switch down even further, the “-s” is used to tell Nmap what kind of scan we want to run. The “-T” in the “-sT” is used to run a scan type of TCP connect.
We use the “-p-“ to tell Nmap to scan all the ports not juse the default 1000. We use the “-Pn” switch to skip the host discovery phase and scan all the addresses as if the

System were alive and responding to ping requests. Finally we specify the target IP address;
obviously, your target’s IP address will be different from the one shown in the screenshot! Shows the TCP connect Nmap scan and the output that was received when run against the Metasploitable target.
Oftentimes, we need to run our scan against an entire subnet, or range of IP addresses.
When this is the case, we can instruct Nmap to scan a continuous range of IPs by simply appending the last octet (or octets) of the ending IP address onto the scan like so:
Nmap –sT -p- -Pn 192.168.18.1-254
Issuing the command will cause Nmap to port scan all the hosts between the IP addresses 192.168.18.1 and 192.168.18.254. just like ping seeps, this is a very powerful technique that can really improve the productivity of your scanning life!
If you need to scan a series of hosts that are not in sequential order, you can create a text file and list each host IP address on a single line.
Then add the “-iL path_to_the_text_file” switch to your Nmap command. Doing this allows you to scan all your target hosts from a single command. Whenever possible, always try to create a single text file containing your entire target IPs.
Having a list saves the effort or retyping, but more importantly, reduces the number of times you will type each IP address and therefore diminishes the change that you will fat finger the IP address and scan the wrong target.
GOOGLE DIRECTIVES: PRACTICING YOUR GOOLGE-FU
If you have any question regarding USING NMAP TO PERFORM A TCP CONNECT SCAN You may ask in the Comment Section. We Would Love to Answer Any of Your Questions.
By Dr Patrick Engebretson | SYNGRESS | Using Nmap To Perfrom A TCP Connect Scan


Pls, what do u mean by host discovery and i don’t understand what 254 is doing when we plan to scan many ip’s
Nmap to port scan all the hosts between the IP addresses 192.168.18.1 and 192.168.18.254